
Driving a Floppy Drive Brushless Motor
I took apart an old floppy drive a while back and in it I found a really nice looking motor. At first I though it just looked nice but I would never get it to run. I thought about throwing it away but then thought "It's cute maybe I will do something with it one day." and threw it in a box with a bunch of other junk that I might do something with one day.
Well, the day has come for the little brushless motor.
The first thing I did was look around and see what was on the Internet (I could become an instant expert). Google has lots of hits on "floppy drive motor" and "brushless motor" and they were not really what I was looking for. I had discarded the circuit board (probably in the box of junk some where) and would need to drive the motor directly with my own driver circuit. Finally, I ran across a link at eLABS called "Driving a three-phase brushless DC motor with Arduino - Part 1. Theory" witch led to "Brushless DC (BLDC) motor with Arduino – Part 2. Circuit and Software". They are wonderfully written and really got me and the motor on my way. Most of what I am writing is how I got the motor to turn a little bit. eLABZ's write-up is more complete and has a lot more on how and why the motors work.
This is just a little project to get the motor to turn. It is not going to power a quadrocopter or a motorcycle but it should get the motor turning without much effort. It might even be a learning experience, it certainly was for me.
The motor
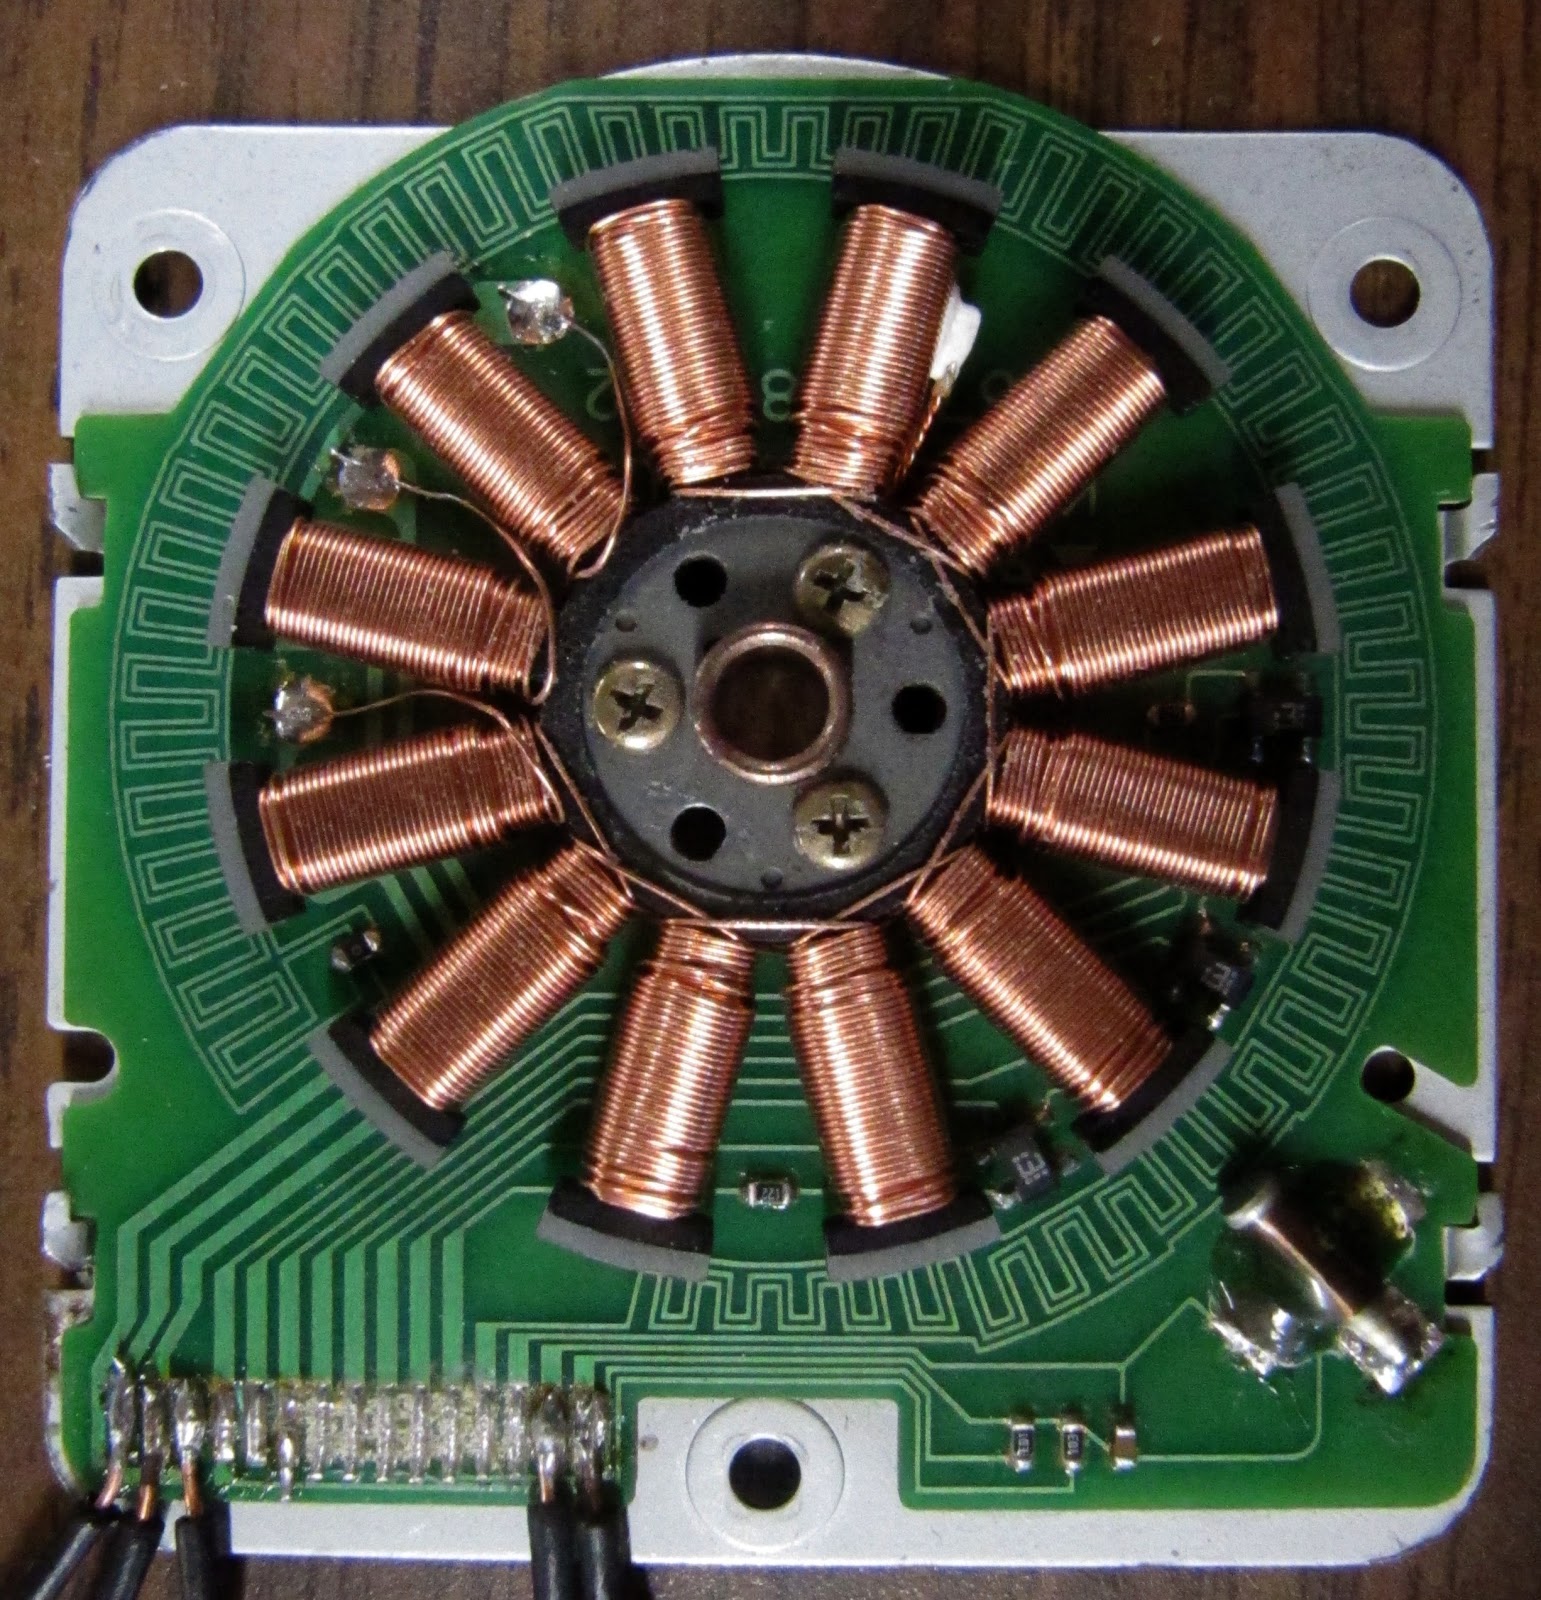
First thing I did was try to find out what each pin on the motor was for. There are 15 pins and to date I have only identified three of them. The first three (see figure #) are to the coils. The last two pins (14 and 15) got to the big sensor that I think is a hall effect sensor (I have not hooked this up yet). That leaves 10 pins unaccounted for but I think they are to more sensors to get position and/or speed information.
| Pins | Function | Nice picture |
| 1 | to coil set #1 | 
|
| 2 | to coil set #2 | |
| 3 | to coil set #3 | |
| 4 - 13 | ??? | |
| 14 | Vin for big hall effect sensor ? | |
| 15 | output for big hall effect sensor ? |
When I started, I expected to see two pins for each set of coils. Instead I found only one pin to each set of coils (there are 12 coils, three sets of four). One end of each set of coils goes to it's pin. The other end is tied to the other two sets of coils. Reading a little about brushless motors I found out why.
So, there are 6 or 7 ohms of resistance between any two pins because the path between the pins goes through two sets of coils. This is sort of nice because I will only need 1/2 h-bridge to drive each set of coils. Each pin will be set either positive (+5V) or negative (to ground). You can see where the coils are tied together two pins to the right of the glob of solder that goes to pin #1.
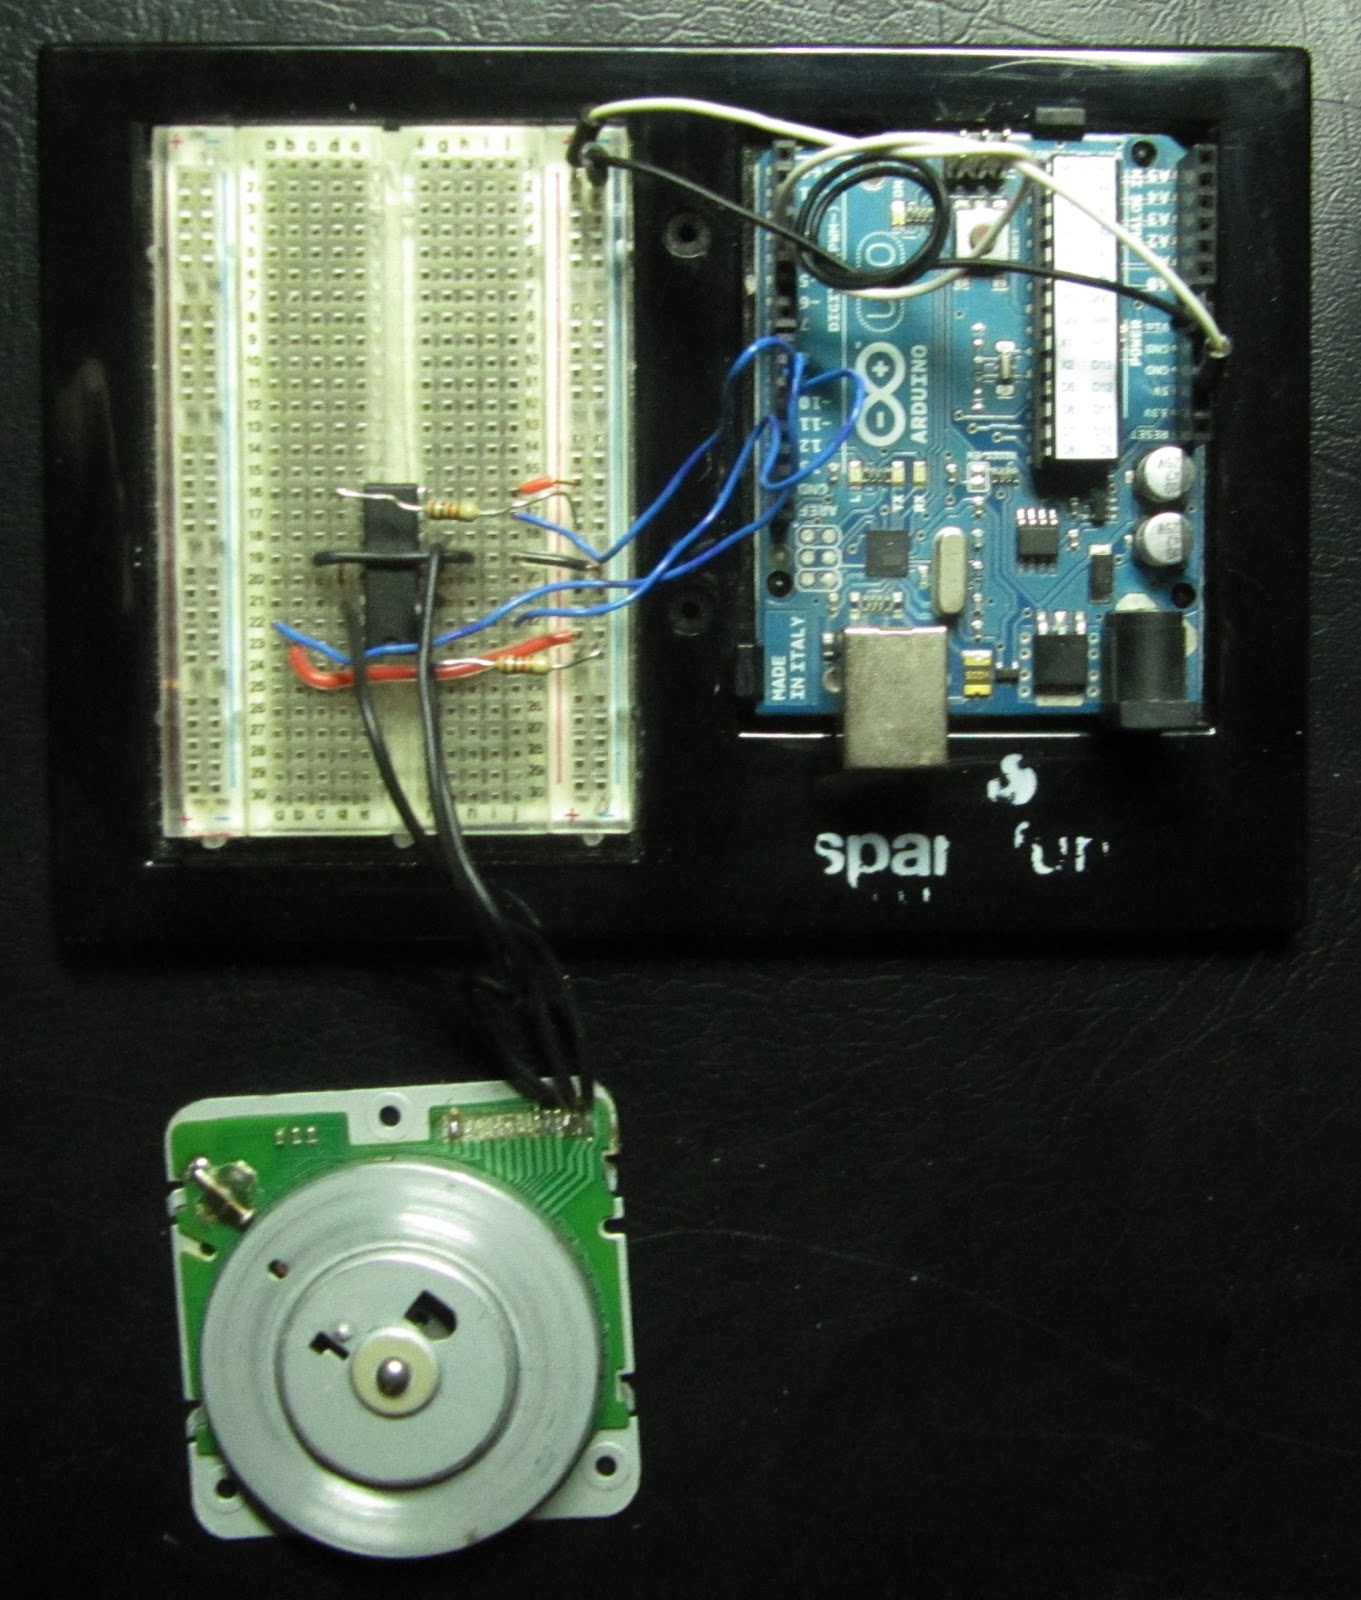
I got out my Ardiuno and set up a little circuit wrote a little program and watch what happened.
First I hooked everything together. I had some L293D quadruple high-current half H-bridge drivers. I could have used discrete transistors but these were sitting there and are all ready to go. I only needed three of the four half h-bridges. The only other components I used were two 1kOhm resistors. I put it all together on a breadboard and wired it to the Arduino.
- Hook up three Arduino pins (9,10,11) to three of the "In" pins on the L293D (2, 9, 12).
- Put 1000k resistors (Brown, Black, Red) between the two "Enable" pins on the L293D (1, 11) and the 5V supply on the Arduino. .
- The L293D pins 4, 5, 12 and 13 get grounded.
- I also hooked the Arduino 5V supply to the Vs and Vss pins on the L293D
- The L293D pins 3, 6, and 14 got to the motor pins 1, 2, and 3.
- Pins 10 and 11 on the L293D are not used (it is the half H-bridge that it not used).

The breadboard and schematic were both made using software from Fritzing. It is really easy to use and I think the results are nice (despite my lack of skills in this area).
The three coils can be hooked up how ever you like. If you get it wrong it might turn backwards. This is because there are only six ways to hook them up. Three of the ways are ABC, BCA, and CAB. The other three ways are just a mirror of the first three, CBA, ACB, and BAC. So, if you get the motor turning and you would like for it to turn the other was you could just switch any two of the three wires.
 |

|
The Program
I wrote a really simple program to drive the motor. It is not meant to be used in any sort of application. It was written to make the motor turn and it works...sort of. Below is a listing for the program. you should be able to copy it directly and nake it work. There are comments in the program (parts with "//" in front of it) that might make reading it easer.
int levels[48] = {127, 144, 160, 176, 191, 205, 217, 228, 237, 245, 250, 253, 255, 253, 250, 245,
237, 228, 217, 205, 191, 176, 160, 144, 127, 110, 94, 78, 63, 49, 37, 26,
17, 9, 4, 1, 0, 1, 4, 9, 17, 26, 37, 49, 63, 78, 94, 110};
// These are the pins used to drive the motor.
int pinA = 9;
int pinB = 10;
int pinC = 11;
int step = 0; // Keeps track of what pulse width to use
unsigned long lastTime = 0; // the time in micros since last step
int period = 5000; // set motor speed by defining time between steps
void setup()
{
// Set pins as digital outputs
pinMode(pinA, OUTPUT);
pinMode(pinB, OUTPUT);
pinMode(pinC, OUTPUT);
// Set all the pins LOW
digitalWrite(pinA, LOW);
digitalWrite(pinB, LOW);
digitalWrite(pinC, LOW);
}
void loop()
{
// Check if it is time for the next step
if ((micros() - lastTime) >= period)
{
// Next three lines send pulse width value for this step.
analogWrite(pinA, levels[step]);
analogWrite(pinB, levels[(step + 16) % 48]);
analogWrite(pinC, levels[(step + 32) % 48]);
// Add one to set (% 48 rolls step back to 0 after it fits 47)
step = (step + 1) % 48;
// make note of current time
lastTime = micros();
// ramps up the speed
if (period > 500)
{
period -= 1; // make speed faster (the period between steps smalled)
}
}
}
 It is a very simple program meant to get the motor to turn. It starts out slow (and not very smooth) and get faster (ans finally runs smoothly).
The top part of the program defines
variables These variables are:
- levels:
- This is the pulse width values (arduino PWM). It is a look-up table and it means the Arduino can just look the value up in this table instead of calculating it each time (these calculations take time, I just did it in another program so the Arduino would not have to.
- pinX:
- These three define the pin numbers for the Arduino's output.
- step:
- This keeps track of where to look in the look-up table.
- lastTime:
- The last time the step was changed.
- period:
- How long to wait after the lastTime to step again.
Then then comes the main loop function. This should not be confused with "a" loop (such as a "for" loop or a "while" loop). It is "the" loop and everything that happens in this loop keeps happening until you unplug the Arduino.
The first line of the main loop checks if enough time has lapsed to move to the next step. It checks with an "if" statement. It uses micros(), a clock that keeps track of how long the Arduino has been on in microseconds. Subtracting lastTime from the time returned with micros() gives the time since the last step. If it is longer than the period then it takes the next step.
The next step (the next three non commented lines) is to write the PWM from the lookup table to the output pins with analogWrite. The first argument (in parentheses) is the pin to write to. The second argument is the value found in the look up table. pinA gets the value of the variable step (the arduino starts counting at 0). When step = 0 the value is 127. pinB gets the value at step + 16. The "% 48" uses the Arduino's modulo operator. It makes sure that the value of step + 16 is not bigger than 47 because there are only 48 values in the look up table(remember the Arduino starts counting at 0. 0 to 47 is 48 values). pinC gets the value at step + 32.
The modulo operator might seem a little confusing but it really makes things easer. Imagine having to write into the program something to deal with step + 16 being bigger that 47. The fact that the Arduino starts counting at 0 might be a little confusing but ... that is the way it is. Computers are like that.
Then the program increments the step by on.
Then it makes note of the current time using micros().
Then there is another if statement that checks if the motor is spinning at the maximum speed yet (the shortest period). If not it subtracts one from period until the period is 500 (that is 500 microseconds between steps).
And that is it. Upload the program to the arduino and watch it run. There is still work to be done to make it run smoother and faster but it turns.
I tried the same technique on a little hard drive motor and it ran really well (sorry no video yet).
There are a few things I would like to change. I think it is under powered and would run better (especially at lower speeds) if I used a power source other than the 5V from the Arduino. I would like to add some speed control to it, maybe a potentiometer, to make it a little more fun. Of course it would be nice to run in both directions with the same program (I just need to have it step backwards through the PWM levels). The coils on the motor look nice and I think I will cut windows in the spindle so they can be seen at the motor turns.
That is all for now. Go and have fun.